Thursday, January 27, 2011

MopedHead's First Ride of 2011

A view from Above:

Last Sunday a few of us got together to go for a ride. Nothing to hectic, just a little ride to Alum Rock Park.


We stopped here for some liquid refreshments (@ the liquor store). Not the kind of bar you want to use the bathroom in, for sure...

A pretty view from a bridge.

Getting ready to leave. It was a good thing too, cause the sun was about to set and it was gettinng cold. The ranger stopped us before we left to make sure we weren't gonna ride any of the trails on the way out. Yeah for sure dood! These are mopeds, not dirt bikes...

Check Out Them Cookies

Trader Joe's has Sugar Cookie Mixes for 99 cents. The box comes with the sugar cookie dry ingredients, 4 sugar colors, 2 frosting packs and 3 cookie cutters. I used my own cookie cutters this time. Total Score! Try making ice cream sandwiches with you're sugar cookies and Trader Joe's Soy Ice Cream for all you lactose intolerants!


Monday, January 24, 2011

Update: Not Your Mom's Astray Herb box

A year has gone by since I build this herb garden and although the plants in it are doing really well, the box is not.

This is the front view of the bottom of the box.

This is the side view of the box.

Looks like I'll have to come up on some sturdier recycled wood or buy some. Anyone got plywood and 2x4's? I can pick it up, just let me know... zofeone@gmail.com

Back Yard Green House

Before Mel and I left for our New Year's vacation, I built a small green house over our garden bed. I wanted to make sure our plants, mainly the tomato plants, survived the winter. Here's how I did it.
First I built this frame at the end of the garden bed. When I sized up this project, I found that the back fence was really sturdy as well as having small holes in just about the right places to attach bailing wire for my frame. So that's what I did. I built the frame and securely attached it to the bottom of the garden bed 2x6. Then I carefully drove in some roofing nails that I had into the top of the frame. These nails are what I fastened the bailing wire to.
After securing the bailing wire to the fence and my frame it was time weed the garden bed and put some clear plastic over it all.
At the bottom of each side, I stapled the plastic to the bottom of the bed. For the front I just folded the excess plastic around, like I was wrapping a present. For the time being I used duct tape to hold it all in place.


Since building the green house, several problems have arose. One was rain. As it turns out, the 2x6's that were used to frame the garden bed were not as securely fastened to each other as they had appeared. Regardless, I don't think this structure secure or not would stand up to a large puddle of water on it's roof. As it turns out, the frame I built was pulled over due to a puddle on the roof. Luckily our house sitter worked it out temporarily while we were out of town. However there is more bad news. Late last week, I was getting ready to fix it, when I came home from work to find the plastic all gone. Bummer. Unfortunately there are a lot of bums in Downtown San Jose with sticky fingers.... And of course now, we seem to be going through some sort of warming trend, so I have no need for it at the moment. When it decides to get cold again, you'll be able to find me back at the drawing board.

Tuesday, November 16, 2010

Peter Peter Pumpkin Eater

Over the course of the last week, I roasted and pureed three pumpkins. Here are the photos and the steps I took.

First I cut the skin off. Last year when I did this, I cut the pumpkin up first and then cut the skin off, based on some advice I got. Boy that was a bummer of a job. This year I thought, why not cut the skin off while the pumpkin is whole. Yeah, this method made all the difference. I recommend using a sharp knife for this.

Now this pumpkin is ready to be cut in to quarters and cubed. For this particular pumpkin, I started out the traditional way, by cutting off the top and scraping out the seeds. However, since I was going to be cutting it into halves then quarters, I found on the other two pumpkins, it was easier to scrape out the seeds later on.


After I cubed the pumpkin, I transferred the pieces to a sheet tray. Before putting the tray in the oven, I added enough water cover the bottom of the tray. The water keeps the pumpkin from burning and sticking to the tray. I roasted the pumpkin in the oven at 400 degrees for approximately 20 minutes or until pumpkin is soft to the touch.


When the pumpkin had cooled, I put the cubes in a food processor to puree it. The last time I did this I think I had to add water to be able to puree it. Of course I didn't have this bad boy back then.. (Shout out to KJ, thanks for the goodies!!) After pureeing, it may be necessary to boil the pumpkin in order to evaporate the excess water. I tried doing this with the first pumpkin I did, but it wasn't really runny. I didn't even bother with the other two. After freezing and thawing, I strain out the excess water before incorporating the pumpking into any recipe. If you skip this step, expecially for a pie, it will come out really wet. No bueno..


Of course I dropped the ball as far as picture taking goes and all I can show you know is the finished product, already bagged and frozen. Between 3 pumpkins (one was a sugar pumpkin and the other two were of the regular carving kind), I got around 8lbs of pumpkin puree. I prefer to bag my pumpkin in increments of 1lb (2c). This is the amount of pumpkin I need to make one pumpkin pie. Since I have so much pumpkin, I have already started experimenting with other recipes. Last Sunday (11/14/10) I made my first batch of pumpkin pancakes. They were pretty good. When I perfect the recipe, I'll send out the memo...

Saturday, November 13, 2010

Pizzas from October

Wet your whistle with these:


Friday, October 29, 2010

Finally Pumpkin Eating Season IS HERE!

Yay! My favorite kind of pie, pumpkin!

Need a pie for your fall or winter holiday? Maybe just because? Well, you're in luck cause I can make that pie, assuming you can't... zofeone@gmail.com..


Thursday, September 30, 2010

Ceremony, San Francisco, Sept 24-26, 2010

a few cool pictures (out of order):


Just crossed the bridge. First exit, Alexander ave.


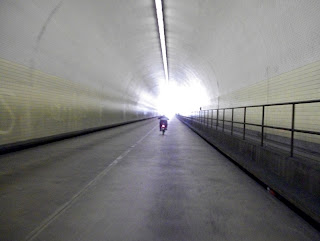
Broadway Tunnel, SF. My favorite shot from the whole weekend.


Luckily this appeared in a time of need. Here is the end of that trail, in Daly City.


The beginning of the Great Hwy. This is at the top above the water and resturaunts.


On our way to the city. Mel's bike, the Hamm's bike, was by far the prettiest bike I saw all weekend.


Dolores Park, Saturday's meeting spot.


16th St. The ride on Saturday has just begun.


I think that this might be considered the freeway.


The view from Golden Gate Park.

Thursday, August 12, 2010

Goonies and Pizza Night!

3 Veggie Pesto Pizza

Tomato, Bacon and Sweet Pepper Pizza


I can't get enough of Mel's pizza plates! They make pizza look beautiful. So last night we had a couple of friends over for pizza. Afterward we went downtown in San Jose, CA and watched the Goonies outdoors with lots of other people. We had a really great time, only enhanced by great pizza and friends!

Wednesday, August 11, 2010

Margret's Chair

Recently Mel and I made the cushions for the captain's chair. A couple of months ago, I started scavenging for materials for the cushions. A few blocks from our house, Mel and I came upon a discarded couch, kind of on a side street. It looked pretty ratty, so I figured someone dumped it there. I came back the next day and cut out the back of the couch. After returning home, Mel suggested that I go back and cut out a couple of the insides of the cushions.

I've actually had the materials for a while now, it was the staple gun that I was really waiting on. Once we got the staple gun, we were ready to begin. First we began by cleaning the material with some Lysol spray. Next we decided which cushion fit better on the top and bottom cushions. We decided to go with one of bottom seat cushions from the couch. With some of the spare filling, we plumped up the inside of the cushion.
Next we had to cut the vinyl to size.

One of the obstacles we had to look out for was that only the vinyl could wrap around the base. I didn't allow for much room when I cut the base pieces of the cushions. I wanted to ensure that when the cushions were made they would fit snugly into the chair without having to re enforce them. I think this style helps to keep all the filling inside a tighter area, helping the overall firmness of the cushion.
First we attached to sides.
Then the other two sides. Once we had all four sides done, we needed to decide how we wanted the corners to fold over. We had to test out two corners at a time to make sure they were at an even firmness. If they didn't match, then we added filling as needed.
After completing the corners, I went around with the staple gun and securely stapled the back side of the cushion.

The bottom cushion is done.

Next we started on the back cushion. First we started by putting the base of the back cushion in the chair while the bottom cushion was in place. We noticed that there wasn't much room for the back cushion to extend as far as the bottom cushion did. We decided to use some of the flat material instead and fold it up on top of the base.

After stapling to sides of the vinyl to the base, we flipped over the cushion and checked for evenness. One side was higher and firmer than the other, so we added more material.


Once more filling had been added to the back cushion, we could move onto the corners. First we pulled one side of the corner over to staple it down.


Next we pulled the extra material the other way and secured it. Then we pulled the excess material out directly away from the corner (pull towards the center of the base). We further secured our work by adding more staples.


After adding the final staples, I ran a pair of scissors around the base and cut all the excess material off. Now it was time to put the cushion in place.


The back cushion took some more finessing than the bottom one. With a rubber mallet and some patience, the cushion fit like a tight glove.
With the cushions complete, I can move on the next phase of the captain's chair. Now I must extend the sides of the chair to fit in the basket more snugly and to improve stability. I also want to add built in speakers to the chair. I am still gathering materials for the speakers, as I am not sure whether I would like to have battery operated speakers or non amplified speakers.